Timeline
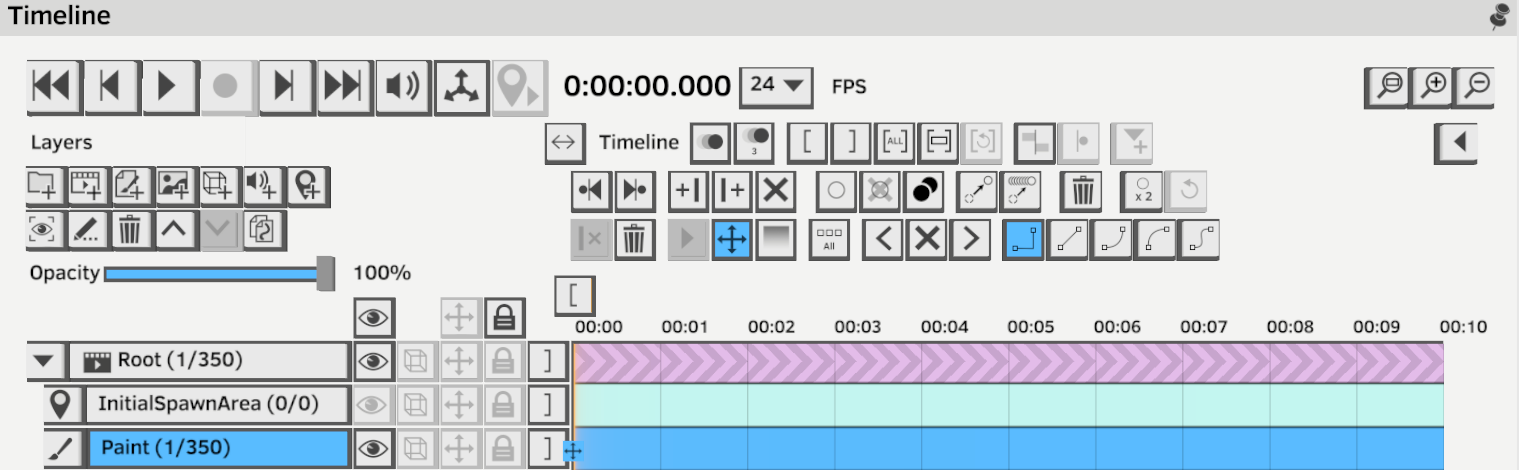
The timeline is a powerful way to organize content and animations and sequence complex narratives.
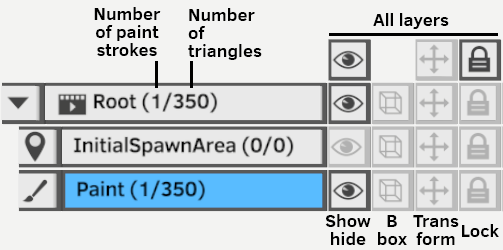
Layers
A Quill scene is organized into layers, you can create new layers of various types with these buttons.

The selected layer is highlighted blue, you can recenter the view on, rename, delete, move in the hierarchy or duplicate the selected layer. Additionally paint layers can be merged with the layer below, and groups that only contain visible paint layers or other groups can be flattened.
Layers can be hidden and shown, their bounding box can be optionally displayed and they can be selected for transform or locked. Statistics are shown as(# strokes / # triangles) to help optimize content for consumption on a wide range of platforms.
When working with static scenes with no animation, the timeline can be collapsed to only display layers.
Clips
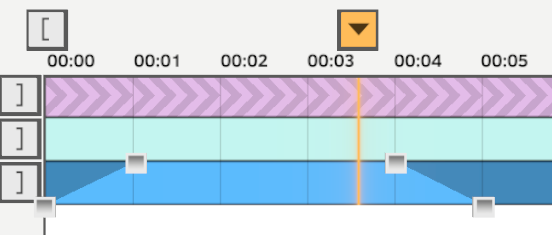
Layers appear on the timeline as clips. By default every layer has a clip starting at time 0 and never ending.
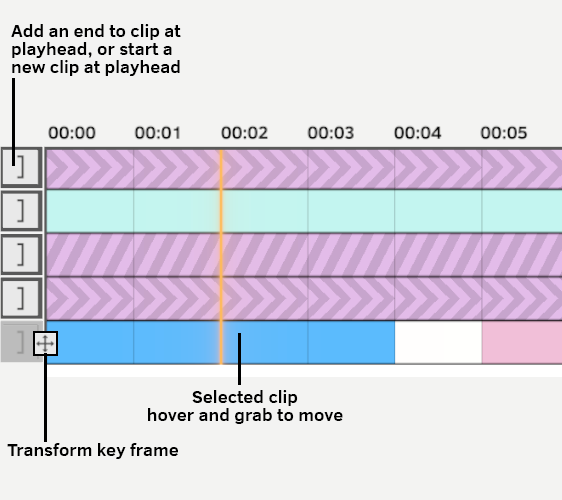
Clips can be made to have an end, and multiple clips of the same layer can exist at different points in time with different properties, allowing asset reuse.
Once selected by touching, clips can be directly manipulated by hovering and using the grab button. Grab the left and right edges to trim and the center part of move the clip.
The selected clip key frames will also appear depending on the mode selected.
Clips are color coded per layer type and additionally groups have a hatched pattern and sequences have an arrow pattern.
Key frames
You can now set keys for clips transformation and opacity values and interpolate between them. Key frames can be set for any layer type. It allows you to create complex nested animations without losing flexibility in editing your animation afterwards.
For example, you could animate a pilot sitting in a plane in a layer group, and animate the group with transform key frames maintaining the ability to make adjustments to the layers within that group. Or you could animate a car with a couple of transform keys and fill up a highway with traffic without the need of frame by frame animation. Since only property values are stored, key frames also greatly reduce file size compared to frame-by-frame animation.
![]()
Key frames can be navigated between created and deleted in the timeline toolbox:

Key frames can be selected touching them (ALT for multiple selection) and moved hovering and using the grab button (ALT to duplicate).
Key frames have different styles of interpolation from stepped (no interpolation) to linear at constant speed, and linear with some easing options (ease in, ease out, ease in & out).
Stops/Plays
Stops are a new concept, native to VR, allowing the story to pause, yet keeping the scene alive. In VR storytelling, there are infinite paths and camera angles. Stops permits the viewer to explore the VR scene at their own pace, allowing them to examine the full scene and scrutinize small details while the scene stays alive. In this way, the creator grants the viewer the power to choose when to continue with the story. This concept doesn’t exist in traditional film!
Plays are where the play head jumps to if you rewind a scene.

Stops and Plays can be defined only in the Root layer of a scene. They will appear as red and blue lines in the timeline and can be manipulated like other kinds of key frames in the Root layer.
Sequence layers
Sequence layers behave similar to Group Layers with one key difference. They are nested timelines within the master timeline. They are used for animated layers to stay alive during a “Stop” or to create loops of animated layers or groups. [Image: image.png]
Any Sequence Layer can be converted back into a Group Layer and vice versa.
To loop a sequence use the looping icon and the play head to determine the loop point.
Paint layers
Paint layers contain key frames that are independent drawings that can be uniquely modified, and hold frames which just hold the same drawing for a period of time. The frame by frame animation can be looped and is rendered on the timeline like this:
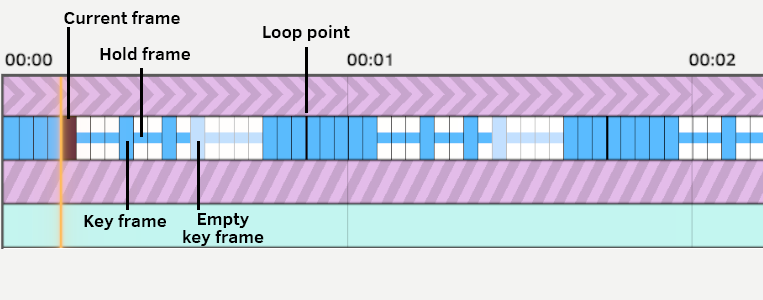
(Note that frames are only rendered when the zoom level is sufficiently high to display them correctly).
The following commands are available when working with paint layers to manipulate key frames and hold frames.
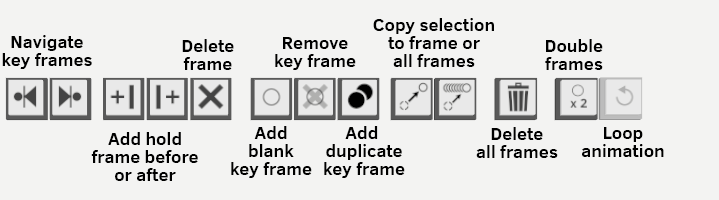
Some of these commands are also available as thumbstick shortcuts on your non-dominant hand controller.
Key frames will quickly increase file size in frame by frame animations, it is important to limit the amount of key frames and use holds to hold static poses for a long time. Any linear motion or type of animation that can be handled with layer transform key frames should be done that way instead.
Picture layers
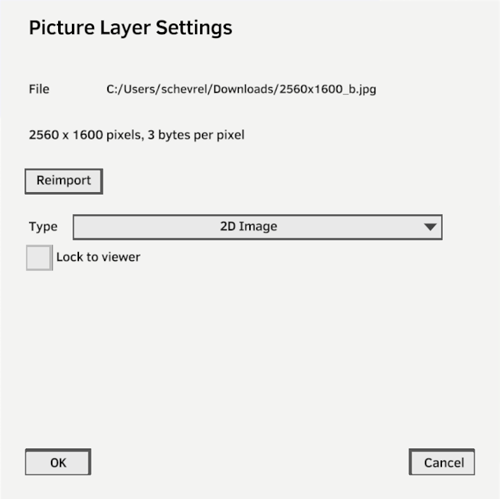
You can import images in png and jpeg format to display in Quill as flat 2D planes or 360 spheres or cubemaps.
Picture layer settings are accessed by touching the image icon before the layer name.
Images can be locked to viewer so they are not affected by the camera.
360 images and cubemaps are an efficient way to add a global environment or backgrounds to your scene.
Model layers
You can import 3D models for reference into your Quill scene.
Models will not be editable with Quill’s tools but their properties can be key frame animated like any other layer.
Model layer settings are accessed clicking the cube icon before the layer name.
Spawn areas
Spawn areas define where the viewer will be located to view the scene.
Playback controls
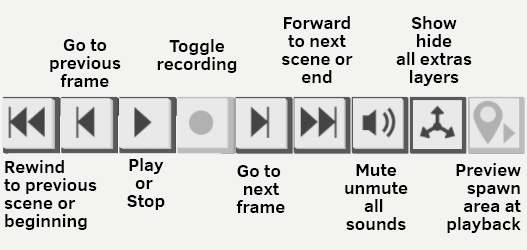
You can start/stop and navigate timeline content with the playback controls.
When in recording mode any live transform or opacity change to a layer will be recorded to the timeline at the play head position.
There are also global mute options for sounds and extra layers, as well as a preview mode to sync the working camera with the default viewpoint.
Timeline options
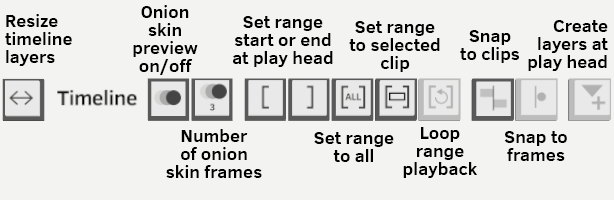
The timeline portion of the display can be resized grabbing the arrows button.
Onion skin options allow previewing animations while stopped.
Range controls lets you select a working range you can easily loop and rewind back to the beginning of when working on a small portion of the scene.
There are also options for snapping and whether to create new layer clips at the play head, or at the beginning.