Publishing to Oculus TV
Sharing your Short Film, Story or Art Piece
The VR Animation Player in the Oculus TV allows viewers to discover and watch immersive VR media stored in the IMM file format. Quill has partnered with Oculus so that publishing Quill animations to the Oculus TV through IMM is easy and convenient, so your audience can enjoy your artwork natively in VR, as you intended it to be watched.
Publishing a Quill piece to the Oculus TV requires three basic steps: (1) making sure the piece can be played on a mobile device with the help of the Optimization Toolbox panel, (2) exporting your piece/film from Quill in IMM format, which you can do directly and easily from the export menu, and (3) then uploading the IMM file to your Oculus Media Studio dashboard so you can control when and how you publish the piece.
In fact, OMS offers a powerful way to control your film. In particular, you can
- View and manage all your VR uploaded films and pieces in one single place.
- Pair 2D video trailers with your VR content to publish on 2D non-VR surfaces. These trailers are linked to the underlying immersive asset, which makes it easy to watch once Saved to VR from the Facebook News Feed or from your content permalink page.
- Link your Facebook Page to your Oculus Organization to optimize distribution of content.
- Publish your films and pieces to Oculus TV (Oculus Quest 2), and get curated for the VR Animation Player (VRAP).
- Understand your audience through analytics such as the amount of time viewers spend watching your pieces in headset.
You can learn more about OMS here: https://creator.oculus.com/media-studio/documentation/media-studio
1. Ensuring the piece can play
The Oculus TV's VR Animation Player (VRAP) works on Quest 2 headsets, which are powered by a mobile chipset. This means that the raw rendering power on the device your viewers will enjoy your film or piece is much lower than that in which you created it in Quill (which happend on a PC). This is expected and not as bad as it might look at first, since Quill has to handle way more algorithmic complexity than the playback engine on the VRAP, since everything can be edited in Quill. By the time the piece plays back in the VRAP through the IMM format, the geometry is known in advance and not editable anymore, which makes it way easier and faster to render.
However it still needs to render in a low power chip, so keeping the film or piece lightweits is important. In fact, the Oculus Media Studio (OMS) to which you'll be uploading the piece won't accept it if it detects it's too heavy or complex. To help you keep the piece lighweight, Quill has the Optimization Toolbox panel.
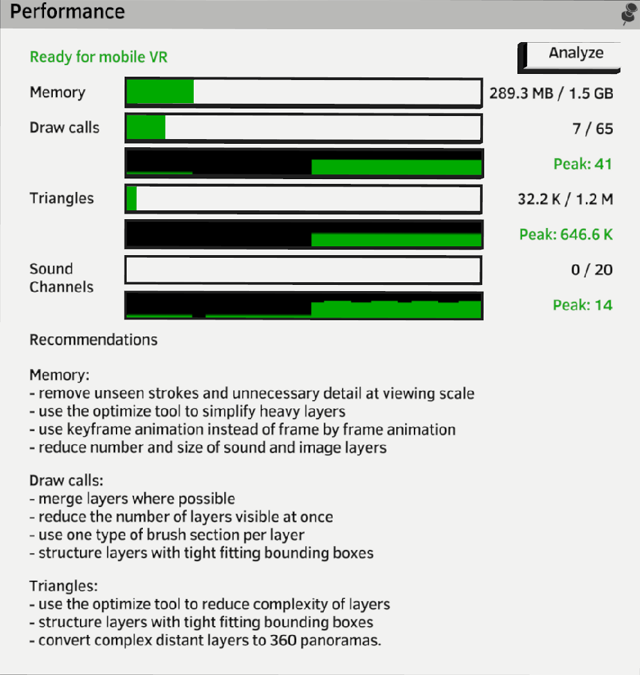
There are four metrics that the OMS uses to determine if a piece is suitable for playback on a Quest 2 headset. If any of them is above the OMS' thresholds, the piece won't be accepted for publishing. Quill takes measurements of these four metrics and uses the same thresholds to help you diagnose why your piece might not be ready for playback on the headset. With this Performance panel inside Quill which you can invoke at any time, you can take the best artistic decisions to see where you can simplify things
The four metrics OMS pays attention to are: (1) Memory used by the piece, (2) number of Draw Calls, (3) number of Triangles and (4) number of Sound Channels.
These are the maximum values for one of these metric:
| Triangles per frame | Maximum 1.2 million |
| Memory usage at any time during playback | Maximum 1.5GB |
| Draw calls at any time during playback | Maximum 65 |
| Sound Channels at any time during playback | Maximum 20 |
You can find the offical and most up to date values in the OMS website, here: https://creator.oculus.com/media-studio/documentation/quill
The metrics are not difficult to understand, except for the "Draw Calls" perhaps. A Draw Call in the context of Oculus TV's VR Animation Player is equivalent to 65536 triangles.
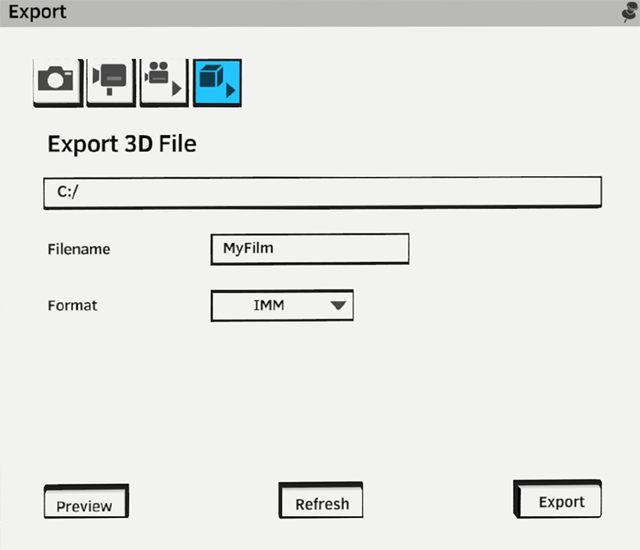
2. Exporting to IMM
Exporting to IMM is done in the Export Toolbox panel.
3. Publishing to Oculus TV
Once you have the IMM file you can upload it to your Oculus Media Studio dashboard located at https://creator.oculus.com/manage/mediastudio/. Click on the blue Upload Media button, and follow the instructions.